
Disclosure: this post may contain affiliate links. As an Amazon Associate we earn from qualifying purchases.
Let me guess. You are most likely thinking about having breathtaking roof top camping experience? After the acquisition of a rooftop tent, what troubles most people is how to mount the tent on top of their vehicle. Here, we will show you why it shouldn’t be that hard.
A rooftop tent is one of the most valuable assets for a successful camping experience.
Installation of most of the rooftop tents is simple since they come with a mounting manual to guide the user. However, if you are having a problem with mounting your roof tent, worry less. We will guide you on how to install your rooftop tent successfully. Feel free to scroll down through the following simple rooftop tent mounting steps.
Contents
Roof Top Tent Mounting Procedure
Step 1: Unboxing A Roof Top Tent
- Cut off all the straps. Most rooftop tents come with hefty straps so you might need a sturdy pair of scissors or a sharp knife.
- Carefully lay the box down on its side. For bigger rooftop tents, you will need help from a friend.
- Pluck the plastic coating and carefully peel it back to reveal your shiny rooftop tent. Admire the beauty!
Step 2: Accessing the Inside
- Unlatch all the four sides of the rooftop tent. So you can easily access the inside
- You locate and remove the ladder and hardware
- The rooftop tent should come with the following contents: Ladder – 1 piece, PVC cover, Annex room, Rod for window, Mounting channel and Mounting accessories
- Make sure they are all available as stipulated in the user manual
Step 3: Assembling the Hardware
- Carefully prepare your equipment. This will make your mounting to run smoothly.
- Ensure all the required bolts are provided. You can file complaints to the delivery company in case they are missing.
4: Lifting and Positioning the Rooftop Tent
- Before lifting the new rooftop on your traveling vehicle. You will have to decide whether to have the tent open at the back or to the side of the truck. For larger size vehicles, remember it is recommendable to have an opening off at the end.
- Lift your rooftop tent onto the top of your traveling vehicle.
- Carefully position the tent so that it is even and centered
- You can use a tape measure to make sure your tent is perched straight and to ensure your open trunk does not hit it.
- You will need to use a tape measure throughout the mounting process to keep checking the placement.
- In case of the Roof Top Tent is mounted on the side, you need to cut the mounting channels to suit the width of the rooftop tent base.
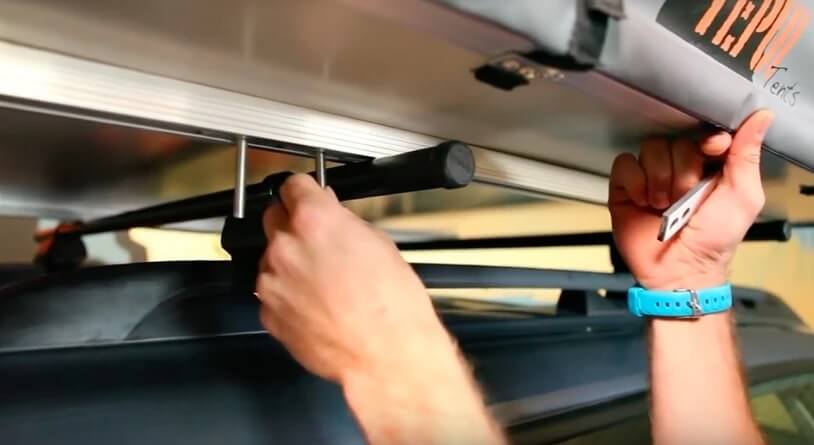
Step 5: Attachment of the Mounting Channels
- Most roof top tent components come fully assembled from the factory especially the small roof top tents. Apart from attaching the mounting channels and the ladder used at the base of the tent.
- Slide the bolts with metal plates into the grooves on the bottom of your tent.
- Do this on both sides of the tent (left and right side)
- Lift the back of the rooftop tent and slide the bolts to the center of the rooftop tent
- For side, mounting make sure the mounting channels should be placed perpendicularly to the hinge side.
- Rear mounting it is important to make sure the mounting channels are placed parallel to the hinge side
- After making sure the tent well-positioned, and all the bolts are well tautened. You should insert the provided rubber end caps. Note you may need a hammer for light taps.
Step 6: Attachment of the Ladder
- Carefully flipping the rooftop tent base over.
- Then locate the already drilled holes usually at the edge of the tent base. Then you attach the ladder bracket to the base using the provided bolts, NY lock nuts, and washers
- For your protection and safety, do not climb the ladder till the accurate angle is achieved.
- When the ladder is well placed, it also plays the role of a brace of the suspended base of the tent
Step 7: Measuring and Tightening
- Complete the last stage of mounting, measurement, and adjustment
- Snug all the bolts, so your rooftop tent is well secured
Step 8: Enjoy Your Well-Mounted Rooftop Tent!
- Climb up the ladder and enjoy your rooftop tent
- You can do a 20 to 30 minutes test drive and recheck the positioning of the bolts.
Closing And Storage Of A Rooftop Tent
- You should use the ladder as a lever to close your tent.
- By carefully pressing down the folding top of the tent base to completely close your tent.
- Then carefully Slide ladder back to the initial storage position.
- Use the Velcro straps to hold bases in a closed position firmly.
Rooftop Tent Mounting Precautions
You should not pull down the straps when closing your tent. Using excessive force on straps can damage your new rooftop tent.
- You should never store your tent while still wet. If it is a must, you do so, you should open and dry out as soon as you get to your destination to protect your tent from being damaged by moisture.
- The overall height of your traveling van is increased, so you should be more careful while driving with the tent mounted.
- The center of gravity is affected when the rooftop tent is mounted on your traveling truck. You should adjust driving to suit this change.
It is our hope if you carefully followed the above steps, the rooftop tent mounting should be quick and easy. Life is better on top!
Amazon and the Amazon logo are trademarks of Amazon.com, Inc, or its affiliates.